I don’t usually talk a lot about recruiting on my blog but here is my second post in two days about signing up to be a demonstrator. I had some e-mail questions and I thought I would post the answers here since it isn’t something we all talk about that often.
One of the questions was whether or not you could sign up to become a demonstrator and never place an order. The answer is YES. I have had several people sign up to become a demonstrator just to get the starter kit, which at $215 (shipping is FREE and there is NO tax on a starter kit!) is a fabulous deal. If you just want the kit (and the Greenhouse Gallery Tote and the new not released yet Eat Chocolate stamp set) and don’t plan to ever place an order that is 100% ok! Your regular discount if you do place orders is 20% but the first order you place is 30% off.
The second question I got was what exactly is in the Starter kit. There is a ton of stuff including stamp sets, ink pads, cardstock and ribbon. The easiest way for you to see what is in the starter kit is to click on the photo below. The best thing about Starter kit is that it is totally customizable. You get to pick which stamp sets, which ink, what colours of cardstock you would like to get.
The third question was whether or not you could still be in my club or classes if you signed up and the answer is OF COURSE. My downline (demonstrators who have signed up through me) have been in my clubs and classes for the past few years so it’s not a problem at all.
As an added bonus, if you sign up to get your demonstrator kit BEFORE October 1st (like the fabulous tote and Eat Chocolate set isn’t enough) you will get to attend my November “Christmas Vacation” card class absolutely free.
How to sign up:
Go to my Stampin Up Website (HERE) and click on the “Start Your Own Business” link along the top of the page. Follow the instructions and see how you can customize your kit. It is NOT finalized until the end so if you want to go in there and play around go right ahead. The only thing you need is my password which is “chocolaterocks”
Monday, September 27, 2010
Sunday, September 26, 2010
My Weekend....
I had such a fabulous weekend! Yesterday I attended a Stampin Up convention in Hamilton with Irene and it was a blast! It was so much fun to meet other demonstrators and to be able to sit and watch awesome demonstrations of some super cute techniques and projects. Those of you who are in my clubs and classes will get to see some of them really soon. Believe me, you won't be disappointed!
I posted three of the pictures I took of the display boards they had out. There were so many fabulous cards to look at. I have a whole box full of cards I swapped with other stampers for you all to check out when come to class and club this month. Believe me, you wish list is going to grow like crazy (mine has) when you see them! Start saving now.....LOL!
Thanks for all the fabulous ideas for what you would like to make in my final Christmas class of the year. Stay tuned this week because I will be posting it on my blog. Congratulations to Anne who's name Mary picked to with the Dasher paper and cardstock package!
The last picture I posted is special because it features the brand new stamp set "Eat Chocolate" which will be available in the next mini! You can earn this set FREE if you sign up to be a demonstrator by October 10th. Whether you just want a discount on all your stamp supplies, just want the Starter Kit ($215) or think you might want to earn some extra money now is a great time to sign up. Not only will you get the fabulous free Eat Chocolate stamp set you will also receive a Free Craft Tote! Contact me if you have any questions!
Thursday, September 23, 2010
Autumn Harvest Halloween
I used three stamp sets to make this card: Wicked Cool for the spider web, Grateful Greetings for, well, the greeting and Autumn Harvest for the pumpkins. What I love about the Autumn Harvest stamp set is that the faces for the pumpkins is a seperate stamp so you can just make a nice traditional fall scene with pumpkins, leaves and squash or you can add the faces for Halloween.
I used white craft ink to stamp the webs on black. It's the only way to get ink to show up on black cardstock unless you emboss in white. The pumpkins were stamped in black and then I used classic ink (More Mustard, Tangerine Tango) and an aqua painter to colour them. I used a sponge dauber and black ink to sponge around the white piece I stamped the sentiment on. I think it gives that instant Halloween look if you sponge things with black!
Tuesday, September 21, 2010
Rich Razzleberry and Old Olive
Just Believe is definitely my favourite set in the new catalogue. I always tend to love flower stamps, ever since I began stamping years ago. This set is so elegant and pretty I keep reaching for it even though I have lots of other new stamp sets I want to use.
I made this card with Rich Razzleberry, Very Vanilla and Old Olive which are absolutely gorgeous together. Not only are these colours super elegant with the Vanilla but they also make super cute Halloween colours if you exhange the vanilla for Basic Black and add some Pumpkin Pie.
It is embellished with an Olive Satin ribbon, the Finial Press embossing folder, the Ticket corner punch and a frame holder from the Styled Silver Hodgepodge kit. I used Old Olive and Rich Razzleberry Stampin Write markers to colour the image before stamping it.
I am planning a non-card Christmas class on December 4th and I am looking for some idea’s of things, other than cards, you would like to make for Christmas. Post a comment and I will enter you into a draw to win a retired pack of Dashing Designer Paper and 8 coordinating sheets of 8 ½ by 11 cardstock. This paper is so super cute with the beautiful Christmas colours of River Rock, Real Red and Old Olive! I will announce the winner of this on Monday so be sure to let me know your opinion before then.
***If you are not sure how to post a comment just click on the title of this post (Rich Razzleberry and Old Olive) and it will take you to a new page where you can let me know what you think!) Don't forget to sign your name to your comment!
My Saturday October 23rd "It's a Wonderful Life" Christmas card class is now FULL but there is still room in the Monday October 25th class.
My next order is going in on Sunday the 26th so if there is anything you need please get your order to me before then!
Sunday, September 19, 2010
Baby Bundle
I don't make a lot of baby cards because most of the people I know are done having babies (we're all way too old...LOL!) but I do know a few people having babies so I thought I would make this sweet little baby card.
I tend to always make baby cards in pink (probably because I have a girl) but the pink could easily be substituted for Bashful Blue in this card. This card was made with the Baby Bundle stamp set and the Short and Sweet stamp set. I used Very Vanilla, Pink Pirouette and Soft Suede as the colours. It is embellished with the Perfect Polka Dots embossing folder, the Modern Label Punch, A Paper flower, Antique brass brad and the ticket corner punch.
I totally forgot to do the draw for the card kit yesterday (my parents came for dinner) so the winner of the card kit is GISELE! Congratulations and thanks to all of you who post comments on my blog. I really love reading what you all write! I will be posting more contests in the next week!
Friday, September 17, 2010
Greeting Card Kids...
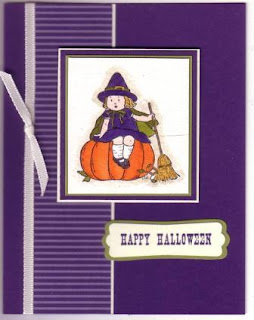
I don't normally make Halloween cards but this little girl is so cute I have to find lots of ways to use her this year! The Greeting Card Kids set is new in the catalogue and the images are just super darling...I hope SU makes another set using these kids! If you love to colour this stamp set is for you.
This card was made with Concord Crush and the main image was coloured by using Classic Ink and a watercolour brush. The Happy Halloween is from the All Holidays stamp set.
I will announce the winner to my last blog contest so you still have one more day to post a comment.
I have added a second date to my "It's a Wonderful Life" Christmas Card class because the Saturday filled up so fast. The class is now available on Monday October 25th, 10 am at my place so contact me to sign up. To see more details on the class click HERE.
Wednesday, September 15, 2010
Just Believe in Brights...
When I first started making this card I pulled out my typical autumn colours (Very Vanilla, Cajun Craze, Early Espresso and More Mustard) mostly because I feel ""Just Believe is a very elegant stamp set and needed elegant colours. Of course I changed my mind and you can see the finished product here.
I stamped the circle stamp with every colour in the Brights colour family and then set them out to see which colours would pop together. In the end I chose Melon Mambo, Tempting Turquoise and Tangerine Tango. I punched the circles with a 1 3/8 circle punch and layered them onto circles I cut out with the Circles #2 Sizzix die. The card is finished with a sentiment (from the Level 3 Hostess set Simply Sent Cute as a Button) stamped in black and a corner rounder punch.
Let me know which colours you are reaching for when you go to stamp and I will enter you into a draw to win a kit to make 5 of the card shown (with lots of different bright colours!)
Tuesday, September 14, 2010
Elements of Style in Pretty in Pink
I’ve been very much into “Autumn “ mode that I thought a pink card would be a nice change of pace today. This card was made with the Elements of Style stamp set with Pretty in Pink, Certainly Celery and Very Vanilla colours. As much as I love pink and bright colours I am finding it really hard to make cards with them at this time of year. I just want to use the rich colours of fall and I can hardly wait to get out all my Christmas stamps and start making cards with them!
Thanks to all who posted a comment below under my Got Treats post. I just did the draw and the winner of the treat kit is Gisele! Congratulations!
Monday, September 13, 2010
"Autumn Harvest" Leaves
I love stamps with leaves on them, especially in the fall because you get to colour them some fun colours. This card took a little bit of extra work. First I have to stamp and emboss all the leaves in the shape of a wreath. I used Black Craft ink and Clear embossing powder for the stamping. To get them in the shape of a wreath I punched out a circle and stamped the leaves around the punch out. This took a few tries to get it looking the way I wanted it. I ended up creating a mask (stamping the image on a post it note, cutting it out on the lines) and placing it on the leaf image I was stamping next to so the leaves wouldn’t over stamp each other.
To colour the leaves I put a few drops of More Mustard ink refill on a tile and then I dipped a small watercolour brush into Champagne Mist shimmer paint. I mixed it in with the More Mustard ink and painted the leaves. I then did the same thing with Cajun Craze ink, adding just a bit more to the leaves to give the leaves a two tone look.
To finish off this card I coloured a Vanilla Taffeta ribbon with a More Mustard Stampin Write Marker. Other items used on this card were the Sanded Background stamp, Cajun Craze and More Mustard Classic inks, gold brads and the Ticket Corner Punch.
My next orders for this month are going in on Saturday September 18th and Sunday September 26th. If there is anything you need please get your order into me before these dates. Thanks!
Saturday, September 11, 2010
Got Treats?
I just love the "Got Treats" stamp set! I make a lot of treats to send to school throughout the year and this stamp set with the super cute Milk Carton die for the Big Shot is going to get used A LOT!!
To make this box I used Tangerine Tango, Very Vanilla and Basic Black cardstock. I used Tangerine Tango Classic ink as well as Chocolate Chip, Old Olive and Basic Black Stampin Write Markers. I finished the box off with Mini Library clips (page 187), Sunny Days Designer Paper and googly eyes for the jack-o-lantern.
Post a comment and tell me what you like to make for Halloween, whether its baked goods, treat holder, cards are any other craft and I will enter you into a draw to win this super cute box as well as the parts to make 6 more! Comment before Tuesday morning because I will be doing the draw then!
Sunday, September 5, 2010
Falling Leaves....
It's so cool today I thought it would be the perfect day to post a card that felt like autumn. This card was made with the stamp set Falling Leaves and the background stamp Sanded. For the colours I used More Mustard, Cajun Craze, Elegant Eggplant and Very Vanilla. I also used the Modern Label Punch (and the Big Shot with Punch Windows for the layer) and the Square Lattice embossing folder to embellish the card..
I am soooo excited that there is only 1 more day until school begins. Today we were cleaning out Mary's backpack and we found last years lunchbox, still full of last years lunch....super gross let me tell you. Needless to say I didn't even open some of the containers because one of them had milk in it and another had yogurt. Thank goodness i bought a few new containers because those ones went straight into the garbage! Along with the lunchbox which did not smell good! I guess that is a lesson to be learned. Clean out the backpack on the last day of school, not right before school starts again!
Congratulations to CeeJay who won my draw for some silver goodies. Be sure to watch my blog for more giveaways this month!
Hopefully you will all see the Holiday Mini in your mailbox by the end of the week! I called and the last of the mini's were sent out by Stampin Up last week so please let me know with a quick e-mail or comment when you get yours!
Friday, September 3, 2010
The Holiday Mini
On September 1st the new Holiday Mini Catalogue began and it is full of some fabulous new autumn, Halloween and Christmas stamps and accessories. Click on the link to check out the fabulous new Northern Flurry embossing folder (page 26), the Candy Countdown Calendar Kit (page 34), the Paisley Prints stamp set (page 11) and much much more!
I hope most of you have got your copy in your mailbox but if you didn't receive it please send me a quick e-mail to let me know so I can make sure you get yours.
There is still three spots in my Super Quick cards class on the 18th. Be sure to let me know if you want to sign up for that.
Post a comment on this post (click the title to post...comments are moderated by me so it won't show up until I approve it) and let me know what you like about the Holiday mini and be entered into a draw to win a roll of Silver Elastic Cord (retired) and Platinum Shimmer paint. I will do the draw on Sunday morning.
Subscribe to:
Posts (Atom)