Tuesday, December 30, 2008

Season of Friendship...Spring


I know spring is still not for a long long long long time but I wanted to post a card this card since the Holiday Mini is almost over and this stamp set many be gone for good (some items from Holiday Mini's do make it into future catalogues but most don't) I do hope this set makes it into the Spring Summer catalogue or the next Fall Winter Catalogue because I sure have used it a lot and I love the cards it makes.

Supplies used to make this card:
  • Season of Friendship stamp set
  • Kiwi Kiss Classic Ink
  • -Close to Cocoa Classic Ink
  • -Pink Pirouette Classic Ink
  • -Whisper White cardstock
  • -Kiwi Kiss cardstock
  • -Pretty in Pink Cardstock
  • -Small and Large Oval Punches
  • -Bella Rose Designer Paper
  • Kiwi Kiss/Very Vanilla Satin Ribbon
  • Pretty in Pink Brads
  • Dazzling Diamonds

Sunday, December 28, 2008

Thanks


This is a cute little thank you card I made using the "Embrace Life" and "Thank You Kindly" stamp sets. It's only 4 1/4 by 4 1/4 size which is he perfect size for thank you cards.
I stamped the flower on white cardstock in black ink and coloured it with an aqua painter and Riding Hood Red ink. I then cut them out and put some Crystal Effects in the center and covered with silver microbeads. I then layered them onto white cardstock and stamped "thanks" below in Going Gray ink. The patterened paper I used on the left hand side of the card is from the Bella Rose Designer Paper series and the green cardstock is Kiwi Kiss.

Sunday, December 21, 2008

Loads of Holiday Cheer

It's still sooooo cold out. I sure hope it warms up soon but I am sure if it does we will have snow storms instead so I won't complain!

Here is cute card I made with the "Loads of Love" stamp set. I stamped the truck on watercolour paper in Black Staz On ink and used a Aqua Painter and Real Red and Going Gray classic inks to colour the truck. The little guy in the truck is from the Loads of Love Accessories stamp set. The patterned paper I used is from the Ski Slope Designer Paper in the Holiday mini.

Saturday, December 20, 2008

One Cool Snow Dude!


It is cold outside today! I wish I could just stay home and stamp today but there is way too much to do. I am definitely not going to the mall though! I get "mall-rage" or rather "Wal-Mart rage" easily at this time of the year! Is it wrong to hit people with your cart? I'm not so sure. I really haven't hit anyone with my cart yet so best that I stay away so I don't get hurt. LOL!
I did this card at one of my classes and it is another version of the card I posted a week ago but it different colours. I love this snowman! This time I used Night of Navy and Baja Breeze inks. Instead of a ribbon I embellished the card with silver brads. The thing I like best about him is that this set is not necessarily Christmas and I can use him in January for some cards!

Tuesday, December 16, 2008

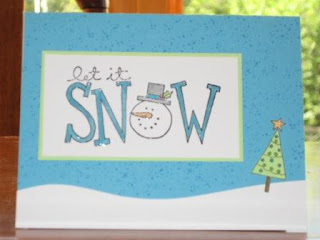
Let it Snow....


This card was made with the Let it Snow and Happy Holiday stamp from the "Big on Christmas" and the Itty Bitty Backgrounds stamp set. I stamped the Let it snow in black craft ink and embossed it with clear embossing powder. I coloured it with markers, layered it onto Gable Green cardstock and set it aside. I stamped the background with Turquoise classic ink on a Turquoise card. I used the SU cutter kit to cut the white cardstock in a wave and glued it along the bottom of the card. I stamped the Happy Holidays in black on white cardstock and trimmed the tree with scissors. I coloured the tree with markers and then added it to the bottom corner. I then attached the Let it Snow image to the front of the card.

Sunday, December 14, 2008

Elves...


Another cute card with the Holiday Lineup stamp set. This time I used the elves and coloured them with markers. The Joy stamp was stamped in Riding Hood Red classic ink and is from the Spotlight on Christmas stamp set and punched out with the 1 1/4 circle punch and layered onto the 1 3/8 circle punch. The stripe patterned paper is from the Kiwi Kiss Designer Series paper and I used Old Olive and Riding Hood Red cardstock to finish off the card.
Only three days left to place and order and take advantage of the free shipping and 20% off retiring stamp sets. E-mail me your order today. The 20% off retired items is not available for online order (although you do save 10% on retiring items and free shipping if your order is $100 or more.)

Friday, December 12, 2008

Silver Season of Joy


Here is another card we made at my last card class. I think the corner rounding gives the card a nice touch. We used the stamp set "Season of Joy" stamp set and embossed the tree and snowflake with Versamark Watermark ink and silver embossing powder. The tree and teh snowflakewere layered onto Brushed Silver cardstock
The Merry Christmas was stamped with Basic Gray ink which looks a lot more subtle than the Basic Black ink. The patterned paper is from the Ski Slope Designer Paper Series and the ribbon we used was the white taffetta.

Wednesday, December 10, 2008

Jolliest Time of the Year....


Not the best picture because the glitter really reflects the light. I used the Jolliest Time of the Year stamp set and the Season of Cheer rub-ons in the Holiday mini. I stamped the snowman with Black Staz On ink on white cardstock. I coloured him with Brilliant Blue and Tempting Turquoise markers. Once I was sure the ink was dry I pressed a Versamark Watermark ink all over the snowman. I then covered it with Iridescent Ice embossing powder and heat it up. I'm so glad that this set is not retiring yet because I just discovered how cute this snowman is and I have always loved the saying that comes with the set.

Tuesday, December 9, 2008

R.I.P Crab and Company....

I thought I would post a few of the cards I made with the Crab and Company stamp set. I can't believe SU is retiring this fabulous set. It is my "go to" stamp set for kids birthday cards because it works for both boy and girl cards. I'm sure I have even used this little cutie for other birthday cards as well. Usually I sell my retired sets but this one isn't going anywhere.

This was the best retirement list I have ever seen with SU. I only lost 9 stamp sets (one being my little crab) If you didn't receive a copy of the list click on my SU link to the right and click on "contact me" so I can send you it. Stampin Up is offering free shipping for orders over a $100 and 10% off all retiring stamp sets.


Sunday, December 7, 2008

Cool Dude


This card was made with stamps from the Two Cool Dudes stamp set (cute isn't he?) I stamped him twice on white card stock with Baja Breeze ink. I then cut the snowman out of one and used Stampin Dimensionals to apply him to the second image (hard to see in this picture) I coloured his nose using and Apricot Appeal stampin write marker. I trimmed the snowman leaving a white border and layered it onto Baja cardstock. I inked the snowflake in Baja ink and stamped it on a scrap piece of paper and stamped it onto the white card. I repeated it again for the second snowflake. I then Stamped teh sentiment and tied the Baja striped ribbon around the card.

Saturday, December 6, 2008

Welcome Christmas Into Your Heart

This simple little card was a big hit at my classes and clubs this year and it was super easy to make. The stamp sets we used are Heard from the Heart (sentiment), Season of Joy (flourish, small flower) and Spotlight on Christmas (larger flower). First we embossed the flower twice on red cardstock using Versamark Watermark ink and clear embossing powder. We then punched the flower with the 5-Petal punch. This card can be made using the large flower in the Season of

Joy stamp set but you have to hand cut the flower so we used the flower from Spotlight on Christmas for convenience. Next we glued the two flowers together. We then put three tiny drops of Crystal Effects in the center of the flower an poured silver microbeads overtop and set it aside to dry.
We then stamped "welcome Christmas.." in black and stamped the flourish stamp twice in Certainly Celery. We stamped the tiny flower in real red on each flourish. The flower was applied to the card with Stampin Dimensionals.
This is an an unusal shaped card (6 1/2 by 3 1/4) which fits perfectly in the small open ended envelopes!

Friday, December 5, 2008

Noel


Here is a cute little card I made using the Big on Christmas stamp set (Noel). I stamped the Sanded background in Ruby Red on a Ruby Red card. I stamped Noel in Black Staz On (a must have if you don't have one!) and coloured the image with Ruby Red, Old Olive and So Saffron markers. I layered that onto Old Olive cardstock. I wrapped a piece of Twill tape around the card and layered "Noel" overtop. I then attached two Old Olive buttons to the bottom right hand corner with Tombow glue, pierced holes through the button holes and tied thread through it (really secured the button to the card when you do it this way)

Monday, December 1, 2008

Holiday Lineup

This is one of the cards we made yesterday in my last scheduled Christmas card class this year. This card was made with the snowmen from the Holiday Lineup stamp set (this set is so cute!) and Gable Green, Green Galore and Real Red cardstocks and inks. The Joy stamp is from the Spotlight on Christmas stamp set and the striped paper is from the Rainbow Sherbert Designer Series Paper.

I did the draw this morning for the free rub-ons and Amber won. Congratulations Amber! Don't forget to e-mail me to enter my retirement stamp contest and remember every $30 you spend until the 7th gives you a ballot to win the Flight of the Butterfly stamp set.

Now I am off to enjoy my snow day!

Friday, November 28, 2008

Simple Silver Snowflake...


Such an easy card to make but it turns out so elegant looking. I cut out four squares of Ski Slope designer paper and layered it onto white cardstock, which I then attached to a Baja Breeze textured cardstock card. I inked the snowflake (from the Snow Swirled stamp set) with Versamark watermark ink and embossed it in silver embossing powder on white cardstock. I layered it onto Baja Breeze textured cardstock, white cardstock and then attached a rhinestone brad to the center of the snowflake.
Holiday Extravaganza - Both the All in the Family and Mission Embossible bundles are now SOLD OUT.

Wednesday, November 26, 2008

Christmas Bags, Tags and Boxes Class...


Here is a picture of a few ofthe projects we will be making at my Christmas Bags, Tags and boxes class on Sunday December 7th, 2pm, at my place. We will be making 2 bags, 6 tags, 3 boxes and one gift card holder. The fee for the class is $30 and includes everything you need to make the projects.

Monday, November 24, 2008

Snow Swirled in Pink!


I know Rose Red and Pirouette Pink aren't your typical Christmas colours but I think they look festive when matched with the silver embossing and silver elastic cord. This card was made with the "Snow Swirled" stamp set embossed with Stampin Up silver embossing powder. The snowflakes on the center piece of Pink Pirouette cardstock was stamped in Pretty in Pink classic ink. I used a pink rhinestone brad in the middle of the main snowflake to add a little extra (I can't ever leave the center of a snowflake alone...it has to have something!)

Friday, November 21, 2008

Festive Noel


Here is a card made with a colour you haven't seen on my blog before. I used Glorious Green for the card base, a colour I tend to accumulate and not use because I find it bright but it's the perfect green to go with Gable Green and Real Red. The Noel stamp is from the Big on Christmas stamp set. I stamped Noel in black and used Glorious Green, Gable Green, Real Red and Yoyo Yellow Stampin Write markers. The polka Dots were stamped in Glorious Green with the Polka Dot Background stamp. I finished the card off with a real red grosgrain ribbon.

Wednesday, November 19, 2008

Snow Swirled Quilt Card


Here is a really simple "quilt" card that I made with the snowflake from the Snow Swirled stamp set. I used paper from the Ski Slope Designer Paper and Real Red, Old Olive and Very Vanilla Cardstock. The snowflake was stamped in Real Red and the clear rhinestone brad is from the Pretties kit. The longest part of making this card is cutting all the layers of paper.

Thursday, November 13, 2008

Season's Greetings.


I made this card using the elegant Holiday Treasure's Designer Paper, a white rub-on from the Season of Cheer rubons and the snowflake from the Snow Swirled stamp set. The best thing about white rub ons is they show up white on every colour of cardstock. I embossed the snowflake in white and set a gold eyelet in the center. I then layered it onto circle punchies and a scallop circle. I love the colours in this card. Who would have thought Chocolate chip would look so fabulous on Christmas cards.
Want to win a pack of rub-ons? Sign up for my Christmas stamp camp on November 30th. I will be giving away a free pack of rub-ons (winners choice) at the class so sign up soon. Click on the link to my website http://www.stampinup.net/esuite/home/stephanied/ to check out the details!

Wednesday, November 12, 2008

Holiday Line-up....


I love this stamp set...it is just soooo cute! And to think I completly overlooked this stamp set until one of my friends ordered it and I saw how cute it is. It is now #1 when it comes to sales for a Christmas stamp set. This was a card we did last Sunday at my card class. The snowman images was stamped with Black Staz On (a must have if you love to colour) and was coloured with a blender pen and Real Red, Pacific Blue, Baja Breeze, Going Gray and Apricot Appeal Classic Inks. I then used 2 way glue pen on all pom-poms and on the santa hat and sprnkled on dazzling diamonds. The "Merry Christmas" is from the Many Merry Messages stamp set, which I have used for years now. The paper is from Ski Slope Designer paper and I used a Real Red grosgrain ribbon to finish the card off.