Tuesday, December 30, 2008

Season of Friendship...Spring


I know spring is still not for a long long long long time but I wanted to post a card this card since the Holiday Mini is almost over and this stamp set many be gone for good (some items from Holiday Mini's do make it into future catalogues but most don't) I do hope this set makes it into the Spring Summer catalogue or the next Fall Winter Catalogue because I sure have used it a lot and I love the cards it makes.

Supplies used to make this card:
  • Season of Friendship stamp set
  • Kiwi Kiss Classic Ink
  • -Close to Cocoa Classic Ink
  • -Pink Pirouette Classic Ink
  • -Whisper White cardstock
  • -Kiwi Kiss cardstock
  • -Pretty in Pink Cardstock
  • -Small and Large Oval Punches
  • -Bella Rose Designer Paper
  • Kiwi Kiss/Very Vanilla Satin Ribbon
  • Pretty in Pink Brads
  • Dazzling Diamonds

Sunday, December 28, 2008

Thanks


This is a cute little thank you card I made using the "Embrace Life" and "Thank You Kindly" stamp sets. It's only 4 1/4 by 4 1/4 size which is he perfect size for thank you cards.
I stamped the flower on white cardstock in black ink and coloured it with an aqua painter and Riding Hood Red ink. I then cut them out and put some Crystal Effects in the center and covered with silver microbeads. I then layered them onto white cardstock and stamped "thanks" below in Going Gray ink. The patterened paper I used on the left hand side of the card is from the Bella Rose Designer Paper series and the green cardstock is Kiwi Kiss.

Sunday, December 21, 2008

Loads of Holiday Cheer

It's still sooooo cold out. I sure hope it warms up soon but I am sure if it does we will have snow storms instead so I won't complain!

Here is cute card I made with the "Loads of Love" stamp set. I stamped the truck on watercolour paper in Black Staz On ink and used a Aqua Painter and Real Red and Going Gray classic inks to colour the truck. The little guy in the truck is from the Loads of Love Accessories stamp set. The patterned paper I used is from the Ski Slope Designer Paper in the Holiday mini.

Saturday, December 20, 2008

One Cool Snow Dude!


It is cold outside today! I wish I could just stay home and stamp today but there is way too much to do. I am definitely not going to the mall though! I get "mall-rage" or rather "Wal-Mart rage" easily at this time of the year! Is it wrong to hit people with your cart? I'm not so sure. I really haven't hit anyone with my cart yet so best that I stay away so I don't get hurt. LOL!
I did this card at one of my classes and it is another version of the card I posted a week ago but it different colours. I love this snowman! This time I used Night of Navy and Baja Breeze inks. Instead of a ribbon I embellished the card with silver brads. The thing I like best about him is that this set is not necessarily Christmas and I can use him in January for some cards!

Tuesday, December 16, 2008

Let it Snow....


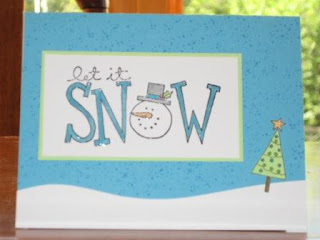
This card was made with the Let it Snow and Happy Holiday stamp from the "Big on Christmas" and the Itty Bitty Backgrounds stamp set. I stamped the Let it snow in black craft ink and embossed it with clear embossing powder. I coloured it with markers, layered it onto Gable Green cardstock and set it aside. I stamped the background with Turquoise classic ink on a Turquoise card. I used the SU cutter kit to cut the white cardstock in a wave and glued it along the bottom of the card. I stamped the Happy Holidays in black on white cardstock and trimmed the tree with scissors. I coloured the tree with markers and then added it to the bottom corner. I then attached the Let it Snow image to the front of the card.

Sunday, December 14, 2008

Elves...


Another cute card with the Holiday Lineup stamp set. This time I used the elves and coloured them with markers. The Joy stamp was stamped in Riding Hood Red classic ink and is from the Spotlight on Christmas stamp set and punched out with the 1 1/4 circle punch and layered onto the 1 3/8 circle punch. The stripe patterned paper is from the Kiwi Kiss Designer Series paper and I used Old Olive and Riding Hood Red cardstock to finish off the card.
Only three days left to place and order and take advantage of the free shipping and 20% off retiring stamp sets. E-mail me your order today. The 20% off retired items is not available for online order (although you do save 10% on retiring items and free shipping if your order is $100 or more.)

Friday, December 12, 2008

Silver Season of Joy


Here is another card we made at my last card class. I think the corner rounding gives the card a nice touch. We used the stamp set "Season of Joy" stamp set and embossed the tree and snowflake with Versamark Watermark ink and silver embossing powder. The tree and teh snowflakewere layered onto Brushed Silver cardstock
The Merry Christmas was stamped with Basic Gray ink which looks a lot more subtle than the Basic Black ink. The patterned paper is from the Ski Slope Designer Paper Series and the ribbon we used was the white taffetta.

Wednesday, December 10, 2008

Jolliest Time of the Year....


Not the best picture because the glitter really reflects the light. I used the Jolliest Time of the Year stamp set and the Season of Cheer rub-ons in the Holiday mini. I stamped the snowman with Black Staz On ink on white cardstock. I coloured him with Brilliant Blue and Tempting Turquoise markers. Once I was sure the ink was dry I pressed a Versamark Watermark ink all over the snowman. I then covered it with Iridescent Ice embossing powder and heat it up. I'm so glad that this set is not retiring yet because I just discovered how cute this snowman is and I have always loved the saying that comes with the set.

Tuesday, December 9, 2008

R.I.P Crab and Company....

I thought I would post a few of the cards I made with the Crab and Company stamp set. I can't believe SU is retiring this fabulous set. It is my "go to" stamp set for kids birthday cards because it works for both boy and girl cards. I'm sure I have even used this little cutie for other birthday cards as well. Usually I sell my retired sets but this one isn't going anywhere.

This was the best retirement list I have ever seen with SU. I only lost 9 stamp sets (one being my little crab) If you didn't receive a copy of the list click on my SU link to the right and click on "contact me" so I can send you it. Stampin Up is offering free shipping for orders over a $100 and 10% off all retiring stamp sets.


Sunday, December 7, 2008

Cool Dude


This card was made with stamps from the Two Cool Dudes stamp set (cute isn't he?) I stamped him twice on white card stock with Baja Breeze ink. I then cut the snowman out of one and used Stampin Dimensionals to apply him to the second image (hard to see in this picture) I coloured his nose using and Apricot Appeal stampin write marker. I trimmed the snowman leaving a white border and layered it onto Baja cardstock. I inked the snowflake in Baja ink and stamped it on a scrap piece of paper and stamped it onto the white card. I repeated it again for the second snowflake. I then Stamped teh sentiment and tied the Baja striped ribbon around the card.

Saturday, December 6, 2008

Welcome Christmas Into Your Heart

This simple little card was a big hit at my classes and clubs this year and it was super easy to make. The stamp sets we used are Heard from the Heart (sentiment), Season of Joy (flourish, small flower) and Spotlight on Christmas (larger flower). First we embossed the flower twice on red cardstock using Versamark Watermark ink and clear embossing powder. We then punched the flower with the 5-Petal punch. This card can be made using the large flower in the Season of

Joy stamp set but you have to hand cut the flower so we used the flower from Spotlight on Christmas for convenience. Next we glued the two flowers together. We then put three tiny drops of Crystal Effects in the center of the flower an poured silver microbeads overtop and set it aside to dry.
We then stamped "welcome Christmas.." in black and stamped the flourish stamp twice in Certainly Celery. We stamped the tiny flower in real red on each flourish. The flower was applied to the card with Stampin Dimensionals.
This is an an unusal shaped card (6 1/2 by 3 1/4) which fits perfectly in the small open ended envelopes!

Friday, December 5, 2008

Noel


Here is a cute little card I made using the Big on Christmas stamp set (Noel). I stamped the Sanded background in Ruby Red on a Ruby Red card. I stamped Noel in Black Staz On (a must have if you don't have one!) and coloured the image with Ruby Red, Old Olive and So Saffron markers. I layered that onto Old Olive cardstock. I wrapped a piece of Twill tape around the card and layered "Noel" overtop. I then attached two Old Olive buttons to the bottom right hand corner with Tombow glue, pierced holes through the button holes and tied thread through it (really secured the button to the card when you do it this way)

Monday, December 1, 2008

Holiday Lineup

This is one of the cards we made yesterday in my last scheduled Christmas card class this year. This card was made with the snowmen from the Holiday Lineup stamp set (this set is so cute!) and Gable Green, Green Galore and Real Red cardstocks and inks. The Joy stamp is from the Spotlight on Christmas stamp set and the striped paper is from the Rainbow Sherbert Designer Series Paper.

I did the draw this morning for the free rub-ons and Amber won. Congratulations Amber! Don't forget to e-mail me to enter my retirement stamp contest and remember every $30 you spend until the 7th gives you a ballot to win the Flight of the Butterfly stamp set.

Now I am off to enjoy my snow day!

Friday, November 28, 2008

Simple Silver Snowflake...


Such an easy card to make but it turns out so elegant looking. I cut out four squares of Ski Slope designer paper and layered it onto white cardstock, which I then attached to a Baja Breeze textured cardstock card. I inked the snowflake (from the Snow Swirled stamp set) with Versamark watermark ink and embossed it in silver embossing powder on white cardstock. I layered it onto Baja Breeze textured cardstock, white cardstock and then attached a rhinestone brad to the center of the snowflake.
Holiday Extravaganza - Both the All in the Family and Mission Embossible bundles are now SOLD OUT.

Wednesday, November 26, 2008

Christmas Bags, Tags and Boxes Class...


Here is a picture of a few ofthe projects we will be making at my Christmas Bags, Tags and boxes class on Sunday December 7th, 2pm, at my place. We will be making 2 bags, 6 tags, 3 boxes and one gift card holder. The fee for the class is $30 and includes everything you need to make the projects.

Monday, November 24, 2008

Snow Swirled in Pink!


I know Rose Red and Pirouette Pink aren't your typical Christmas colours but I think they look festive when matched with the silver embossing and silver elastic cord. This card was made with the "Snow Swirled" stamp set embossed with Stampin Up silver embossing powder. The snowflakes on the center piece of Pink Pirouette cardstock was stamped in Pretty in Pink classic ink. I used a pink rhinestone brad in the middle of the main snowflake to add a little extra (I can't ever leave the center of a snowflake alone...it has to have something!)

Friday, November 21, 2008

Festive Noel


Here is a card made with a colour you haven't seen on my blog before. I used Glorious Green for the card base, a colour I tend to accumulate and not use because I find it bright but it's the perfect green to go with Gable Green and Real Red. The Noel stamp is from the Big on Christmas stamp set. I stamped Noel in black and used Glorious Green, Gable Green, Real Red and Yoyo Yellow Stampin Write markers. The polka Dots were stamped in Glorious Green with the Polka Dot Background stamp. I finished the card off with a real red grosgrain ribbon.

Wednesday, November 19, 2008

Snow Swirled Quilt Card


Here is a really simple "quilt" card that I made with the snowflake from the Snow Swirled stamp set. I used paper from the Ski Slope Designer Paper and Real Red, Old Olive and Very Vanilla Cardstock. The snowflake was stamped in Real Red and the clear rhinestone brad is from the Pretties kit. The longest part of making this card is cutting all the layers of paper.

Thursday, November 13, 2008

Season's Greetings.


I made this card using the elegant Holiday Treasure's Designer Paper, a white rub-on from the Season of Cheer rubons and the snowflake from the Snow Swirled stamp set. The best thing about white rub ons is they show up white on every colour of cardstock. I embossed the snowflake in white and set a gold eyelet in the center. I then layered it onto circle punchies and a scallop circle. I love the colours in this card. Who would have thought Chocolate chip would look so fabulous on Christmas cards.
Want to win a pack of rub-ons? Sign up for my Christmas stamp camp on November 30th. I will be giving away a free pack of rub-ons (winners choice) at the class so sign up soon. Click on the link to my website http://www.stampinup.net/esuite/home/stephanied/ to check out the details!

Wednesday, November 12, 2008

Holiday Line-up....


I love this stamp set...it is just soooo cute! And to think I completly overlooked this stamp set until one of my friends ordered it and I saw how cute it is. It is now #1 when it comes to sales for a Christmas stamp set. This was a card we did last Sunday at my card class. The snowman images was stamped with Black Staz On (a must have if you love to colour) and was coloured with a blender pen and Real Red, Pacific Blue, Baja Breeze, Going Gray and Apricot Appeal Classic Inks. I then used 2 way glue pen on all pom-poms and on the santa hat and sprnkled on dazzling diamonds. The "Merry Christmas" is from the Many Merry Messages stamp set, which I have used for years now. The paper is from Ski Slope Designer paper and I used a Real Red grosgrain ribbon to finish the card off.

Monday, November 10, 2008

Welcome Christmas....


Another quick and easy card I made using Season of Joy and Heard from the Heart stamp sets. The flowers were stamped with Riding Hood Red, cut out and attached to the white panel that had been stamped with swirls in Kiwi Kiss. The sentiment was then stamped below. The center of the flowers are embellished with silver micro beads from the Silver Bead Duo. I used Crystal Effects glue to attach the beads to the flower because it dries clear and is thick enough to hold the beads in place.

Friday, November 7, 2008

Stamp Camp #1

There is still one space in this Sunday's stamp camp. We will be making 10 cards, 2 each of 5 different designs. The class fee is $30 and the class starts at 2pm at my place. Click on the link to the left that says Stephanie's Stampin Up Website to contact me!

Holiday Greetings....


Here is a fun card I made with absolutely no stamping! The background paper is from the Bella Rose Designer Paper Series. Not a Christmas paper but these colours look fabulous on a Christmas card, especially using the Scallop Edge punch. The snowflakes are the Little Felt Flurries that are in the Holiday mini and I used Rhinestone brads from the Pretties kit to secure them to the card. The Holiday Geetings is from the Season of Cheer rub ons in the Holiday Mini (on sale this month!)

Thursday, November 6, 2008

Pocket Silhouettes....


I thought it would be nice to post a card that wasn't Christmas, since all I have been making lately is Christmas cards. The Pocket Silhouettes is such a cute little stamp set. I challenged myself to make a card using some colours I almost never use. Since I don't use purple or blue all that often I chose purple for this card. I used Pale Plum (cardstock), Perfect Plum (cardstock), Elegant Eggplant (cardstock and Classic ink) and Whisper White on this card. I also used silver brads and Elegant Eggplant Grosgrain ribbon.

Monday, November 3, 2008

Mr Twigster...


Here is a cute little card I made using the tree from the Mr Twigster stamp set (Holiday Mini) and a scallop chipboard frame. The chipboard frame is covered Riding Hood Red cardstock (I traced the frame onto Riding Hood Red and cut out with Paper Snips and punched the center out with a square punch.) I stamped the tree with basic black and used a Riding Hood Red Classic, Close to Cocoa and Old Olive Classic inks with a blender pen to colour it. I layered it under the scallop frame. I wrapped Very Vanilla Wide Grosgrain and Riding Hood Red tafetta ribbon around and Old Olive card. The Very Merry saying was stamped in black and is from Short and Sweet stamp set.

Monday, October 27, 2008

Sweet Always


This is a simple little card I made with the Sweet Always Designer Paper (pretty isn't it?) I can't believe that just over a year and a half ago I was pretty resistant to using patterned papers on cards. Now I don't think I can live without it! Now these are colours I wouldn't normally put together but I think the Pumpkin Pie, Pirouette Pink and Regal Rose look great together. I used felt flowers from Flower Fusion (the Pumpkin Pie flower) and Flower Fusion Too (the Pink Pirouette flower) as the central focal point. I used a Rhinestone brad in the middle to attach to the card.

Sunday, October 26, 2008

Best Wishes Season of Friendship....


I just love this set, Season of Friendship. It's my absolute favourite out of the new Holiday Mini. I especially love it with the new Autumn Vine Designer Paper. I am already on my second pack and I rarely have to buy a second pack of any of the paper because one pack goes a long way when you are making cards. On this card I used Chocolate Chip, Really Rust and More Mustard. The best wishes stamp is from the Short and Sweet stamp set (all the sayings in this stamp set fit in the small oval punch) It's hard to tell in this picture but the card is made from Chocolate Chip textured cardstock. It is absolutely fabulous looking in person!

Friday, October 24, 2008

Birthday Hugs and Wishes....


I am loving the colours in this card. I haven't used most of them in who knows how long! The dot background paper is from the Rainbow Sherbert Designer Paper, same with the box below. The Birthday Hugs and Wishes (from the Birthday Hugs and Wishes stamp set) was embossed in white on a Green Galore circle (cut with the coluzzle) The stitching was done by piercing the cardstock and drawing in the white stitch lines with a white signo gel pen and I attached three Apricot Appeal brads below. This was layered onto a white circle and onto a large Tempting Turquoise Scallop Circle (Cut with the Big Shot and Scallop Circle die in the Holiday Mini) The flower is from the Ginormous Flowers stamp set (stamped in Apricot Appeal) and trimmed carefully.

The pillow box was made using the Big Shot and the Pillow Box die from the holiday mini. I am having so much fun with these little boxes! The Happy Birthday stamp is from the Think Happy Thoughts stamp set and it all the circles and the scallop circles were punched with Stampin Up punches. It only took a few minutes to make but it's a great little box to make fun little treats for everyone you know!

Wednesday, October 22, 2008

Birthday Cupcake


Yesterday was winter so here is a nice bright card to take your mind off it! The cupcake is from the Crazy for Cupcakes stamp set. I coloured it in with markers and then used a two way glue pen on the icing and covered it with Dazzling Diamonds glitter (I love Dazzling Diamonds!) The polka dots one the side are from the Polka Dot background stamp and the sentiment (stamped nice and crooked...I know some of you are enjoying that!) is from the Crazy for Cupcakes stamp set too. The colours I used were mostly from the Bold Brights (Pink Passion, Pixie Pink and the confetti is various colours from the Bold Bright family) The card was made from the new "In-Colour" Pink Pirouette. I also used pink rhinstone brad.

Tuesday, October 21, 2008

Hello Winter!


This is what we woke up to this morning. While it's absolutely beautiful it's going to kill all our trees! I couldn't even walk Mary down the driveway this morning to catch the bus because all of our trees were drooped down over the driveway. Needless to say we got snowy and wet as we tried to shake the snow off the trees. Unfortunately it is wet and heavy but we managed to get through. I'm sure it's going to melt (or I really hope it is) but welcome to the first snowfall of the year!

Monday, October 20, 2008

Snappy Birthday Crab


Another card with my really cute crab. I love this little guy, especially after adding the googly eyes (I LOVE googly eyes!) This one was made with Real Red and I used the Real Red DP from the Hostess Benefits Level 1.
This months birthday sale is almost over and Crab and Company is just one of the stamp sets you can get on sale. This sale ends October 31st so be sure to get your order to me this week so you don't miss out.
Spend $20 on regular priced merchandise and save 20 % on Big Bold Birthday (page 62), Party Hearty (page 63), Bitty Birthday (page 64), Crazy for Cupcakes (page 64), Time to Party (Page 65), Simple Birthday Thanks (page 65) and Crab and Company (page 68)

Saturday, October 18, 2008

Faux Silk Upsy Daisy...


Here is a simple little card I made using the Upsy Daisy stamp set, Urban Garden Designer Series Paper the Faux Silk technique (instructions below in the Oct. 3rd posting) The only difference on this card is that I stamped the Upsy Daisy Flowers on both sides of the tissue, Baja Breeze on one side, Night of Navy on the other side. I just love the colours in the Urban Garden DP, and it looks fabulous with the Upsy Daisy stamp set.

Wednesday, October 15, 2008

Eastern Blooms Thanks


I make a lot of thank you cards, I don't know why but I do. I really need to pull out some of my other sentiment stamps! This was a super easy card I made with the Eastern Blooms and Thank You Kindly stamp set with the colours Kiwi Kiss, Riding Hood Red and Tangerine Tango. In the center of the large flower I used one of new Filigree brads which I love so much I have been hoarding them. I finally broke down and used one! I also used the really beautiful Kiwi Kiss Satin ribbon (it's double-sided ribbon, the other side is very vanilla)

Monday, October 13, 2008

Hoot Hoot Hooray!


Another great card using the "Owl Together Now" stamp set! I just love these little owls and they are so much fun to make cards with. The little googly eyes (from Wal-Mart!) look great on these owls. I did this one in "man" colours of Basic Gray, Going Gray and Brocade Blue. The background is stamped with the Weathered Background stamp.

Saturday, October 11, 2008

Awesome Autumn Class....

This is one of the cards we will be making at the Awesome Autumn Class next Sunday (the 19th) at 2pm (my place) We will be making 5 cards using all beautiful autumn colours like Chocolate Chip, Old Olive, Pumpkin Pie, Really Rust and more. The cards will feature techniques such as Chalk and Versamark Watermark, Glossy cardstock, water colour, water misting and more. There is still room to sign up so e-mail me today. $25 or FREE when you make a purchase of $75 (merchandise total before tax and shipping) or more that same day.

Thursday, October 9, 2008

Autumn Tree....

I can't believe I haven't bought the stamp set "Lovely as a Tree" before this year. It's been around for ages but I finally broke down and bought it this fall. I've really enjoyed stamping this particular stamp on various backgrounds. This background was done with my SU watercolour crayons and my aqua-painter on watercolour paper. The other stamps I used was the Sanded background stamp and the "warm wishes" stamp is from the Beautiful Borders stamp set.

Friday, October 3, 2008

Inspired by Nature....

I am having so much fun with the stamp set "Inspired by Nature" This is a card we made at last month's Stampers Club meeting using the stamp set and a technique called Faux Silk (instructions below) I also used the the "To You from Me' stamp from the Hostess set Best Yet and the Background stamp "Sanded"

Faux Silk Technique

1. On a piece of white tissue paper I stamped the cone flowers with Riding Hood Red, Old Olive and Close to Cocoa.

2. While it was drying I stamped the grass image with Kiwi Kiss on Very Vanilla Cardstock.

3. When the tissue image was dry I crumpled it up and then flattened it out. I covered the Vanilla cardstock panel with a glue stick and gently pressed the tissue paper image overtop, trimming the extra tissue paper away.

Although it's hard to see the texture in the picture it's a really nice technique.

Wednesday, October 1, 2008

Season of Friendship


I LOVE this set! Season of Friendship is one of the new sets in the new Holiday Mini Catalogue that starts today. This is a very simple card I made with the set but it's one of my favourites. I used Chocolate Chip, More Mustard and Really Rust (a colour combination I keep reaching for this fall!) and the leaves were stamped using the Rock and Roll technique. The rock and roll technique is when you ink your stamp with a lighter colour (like More Mustard) and the you roll your stamp edges onto a darker inkpad (like Really Rust) before you stamp. This technique works best with solid image stamps like the leaf. The little felt flower is from the Flower Fusion Too collection.

Friday, September 26, 2008

Take a Halloween Class....and get a free stamp set!


Here are a few of the items that we will be making at my Halloween class on Sunday October 5th. We will also be making a bag topper and a tag (each with a bag of CANDY!) This class is absolutely adorable and you don't want to miss out on it!
Now to the "free stamp set" part of the class. Take the class and you get to choose any stamp set from my "used stash" I have some great sets leftover from the last catalogue as well as past hostess and Sale-a-Bration stamp sets. I need to get this stuff out of my stamp room and this is a great way to give them all new homes. Sign up now...space is limited!

Wednesday, September 24, 2008

Thoroughly Thankful


I love pumpkins...especially in my garden. We didn't grow any this year since we were away all summer so the best I can do is stamp them. The main image is from the "Thoroughly Thankful" stamp set, stamped on watercolour paper and coloured with my aquapainter and classic inks. The image is actually double this size but I only used half of it for this card. The patterned paper in the background is from the Kiwi Kiss Designer Prints paper, just beautiful! The "kindness" stamp is from the "Heard from the Heart" stamp set

Monday, September 22, 2008

Pretty Upsy Daisy...


I have been doing so much with Autumn and darker colours lately it was so nice to work with pink again. This is one of the cards from my Upsy Daisy class this past weekend and I just love the Regal Rose, Rose Red and Barely Banana colours. I used the Wide Oval Punch on the sentiment and used the Coluzzle to cut the larger Rose Red oval to layer it. I think the Scallop Edge Punch gives this card the perfect "pretty" touch! The Upsy Daisy set is so easy to work with and comed with some great sentiments. It's on sale until September 30th for $19.51!

Saturday, September 20, 2008

Sunflower


I had an urge to make a sunflower card since I have a bunch of sunflowers growing outside my craft room but I have NO sunflower stamps. Then I came up with the idea of dying a flower from the Pretties kit yellow (with Summer Sun ink refills) and punched a q 1/4 circle from Close to Cocoa. I then stamped it with the Sanded background stamp in Chocolate Chip ink. I also used the Sanded stamp in Chocolate Chip on the Summer Sun background. The Thank You stamp is from the Wow Flowers Stamp set.

Wednesday, September 17, 2008

From Owl of Us...


Now this is just the cutest stamp set and I am having so much fun with it. Being a "floral" stamper I am finding that I am starting to love some of the cute stamp sets like this "Owl Together" stamp set and Crab and Company (on sale next month!) For this card I stamped the owls and branch on watercolour paper and used the aqua painter (also on sale next month!) and re-inkers to colour. The colours I used were Chocolate Chip, Riding Hood Red and Close to Cocoa.

Sunday, September 14, 2008

Simple Thanks


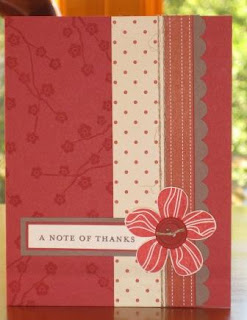
Here is a super quick and super easy thank you card I made. I used the stem from the stamp set Eastern Blooms and stamped it once in Chocolate Chip and once in Baja Breeze on white cardstock. The cardstock I used was Chocolate Chip and Baja Breeze and the striped paper is from the Designer Series Print in Baja Breeze. The card is finished off with a chocolate chip grosgrain ribbon and the "A Note of Thanks" from the Thank You Kindly Stamp Set stamped in Chocolate Chip.

Thursday, September 11, 2008

Autumn Harvest


I made this card over a year ago using the Autumn Harvest stamp set on watercolor paper. The "thank you" stamp is from the Short and Sweet stamp set (and all the sayings in that set are perfect for the oval punches!) I stamped all the images in classic ink and used an aqua painter and classic ink refills to colour them in!

Monday, September 8, 2008

Eastern Blooms Thanks


This is one of the cards we made at my new catalogue party two weeks ago using the Eastern Blooms stamp set and the Thank You Kindly stamp sets. We also used the new "In-Colours" Tangerine Tango and Kiwi Kiss as well as the "new black" Chocolate Chip.
Exciting news, starting later today, you can now place your orders online through my Stampin Up demonstrator webiste at:
Of course you can also place your orders through me but if you feel the urge to order something at 2am and don't think it would be right to call me at that time (it really wouldn't be allright!) now you have another option.

Tuesday, September 2, 2008

Upsy Daisy Class....


Upsy Daisy Class - $35
Class price includes your very own “Upsy Daisy” stamp set! We will be making 4 different cards featuring the beautiful “Upsy Daisy” stamp set (page 101). Please be sure to sign up and pre-pay for this class by September 7th to ensure your stamp set is here in time for the class. The actual class will be on Sunday September 21st, 2pm at my place.
Everyone who signs up for the class will get one of the 10 past hostess sets/Sale-a-bration sets that I have sitting here absolutely FREE!. Deadline for signing up is September 7th. Don't miss out on Free stamp set (and the class will be great too...Upsy Daisy is an awesome set!)

Monday, September 1, 2008

Eastern Blooms


I made this card last night using the new Eastern Blooms set and the Thank You Kindly stamp sets. The patterned paper is from the Washington Apple Designer Paper. All the colours look kind of different in the picture but all the reds are Riding Hood Red. and they look exactly the same in real life.
I have been having a lot of fun playing with some new stamp sets and will be posting more on my blog in the next couple of days. I will also be posting some blog only give-aways over the next few weeks so stay tuned!